Difference between revisions of "Howto upload homework"
From Programming for Artists
Moorejoseph (Talk | contribs) (→Exporting the Sketch as Javascript) |
Moorejoseph (Talk | contribs) (→1) Export the Sketch as Javascript) |
||
| (3 intermediate revisions by the same user not shown) | |||
| Line 1: | Line 1: | ||
==1) Export the Sketch as Javascript== | ==1) Export the Sketch as Javascript== | ||
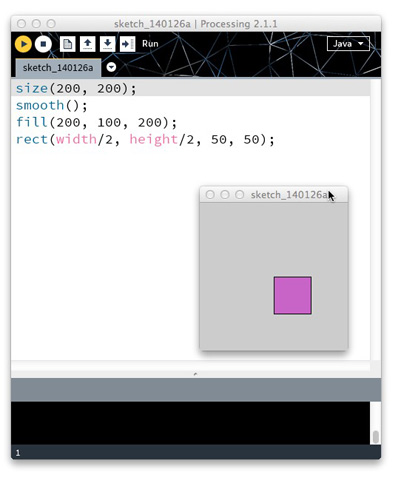
| − | *Open your processing code in | + | *Open your processing code in Java mode and run the sketch. |
| − | [[File: | + | [[File:ProcessingScreen1.jpg]] |
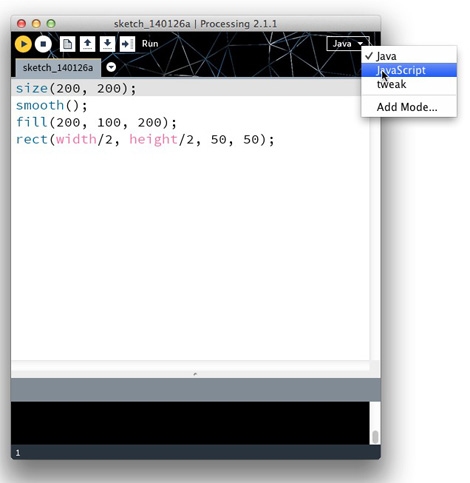
*If it runs switch to "javascript" mode. | *If it runs switch to "javascript" mode. | ||
| − | [[File: | + | [[File:ProcessingScreen2.jpg]] |
*Try running the sketch again, it will open in a browser. If all is well move on! | *Try running the sketch again, it will open in a browser. If all is well move on! | ||
*In the Processing application go to '''sketch --> show sketch folder''' This should open the directory your Processing sketch is located in. | *In the Processing application go to '''sketch --> show sketch folder''' This should open the directory your Processing sketch is located in. | ||
| Line 10: | Line 10: | ||
[[File:screen3_export.jpg]] | [[File:screen3_export.jpg]] | ||
| − | == | + | ==2) Upload the Files to the Server== |
You need [http://cyberduck.ch Cyberduck] or a similar sftp client to upload your work to the server. | You need [http://cyberduck.ch Cyberduck] or a similar sftp client to upload your work to the server. | ||
| Line 16: | Line 16: | ||
*Once you have logged into the server go to your folder and create a new folder to contain the setch. Give the folder the same name as your homework. If it is exercise 2 then name the directory "exercise_2." | *Once you have logged into the server go to your folder and create a new folder to contain the setch. Give the folder the same name as your homework. If it is exercise 2 then name the directory "exercise_2." | ||
*Move the 3 files: processing.js, index.html, and some_name.pde into that folder. | *Move the 3 files: processing.js, index.html, and some_name.pde into that folder. | ||
| − | *You should now be able to see your sketch online at a url like the following: http://understandingnewmedia.com/p4a/f2012/user_name/exercise_2/ | + | *You should now be able to see your sketch online at a url like the following: http://understandingnewmedia.com/p4a/f2012/user_name/exercise_2/ where user_name is the name of your folder and exercise_2 is the name of your exercise folder. |
| − | == | + | ==3) Link to the file on the wiki== |
Whew! Now let's create a link to your project on the wiki. | Whew! Now let's create a link to your project on the wiki. | ||
Latest revision as of 14:22, 26 January 2014
1) Export the Sketch as Javascript
- Open your processing code in Java mode and run the sketch.
- If it runs switch to "javascript" mode.
- Try running the sketch again, it will open in a browser. If all is well move on!
- In the Processing application go to sketch --> show sketch folder This should open the directory your Processing sketch is located in.
- In the sketch directory you should see a folder named "web-export" in that folder are the 3 files you will need to upload to the class server.
2) Upload the Files to the Server
You need Cyberduck or a similar sftp client to upload your work to the server.
- To connect to the server enter in the necessary information (I will give this to you in class.)
- Once you have logged into the server go to your folder and create a new folder to contain the setch. Give the folder the same name as your homework. If it is exercise 2 then name the directory "exercise_2."
- Move the 3 files: processing.js, index.html, and some_name.pde into that folder.
- You should now be able to see your sketch online at a url like the following: http://understandingnewmedia.com/p4a/f2012/user_name/exercise_2/ where user_name is the name of your folder and exercise_2 is the name of your exercise folder.
3) Link to the file on the wiki
Whew! Now let's create a link to your project on the wiki.
- Log in to this website.
- Go to "Exercises" in the right hand navigation
- Under the proper exercise name click edit and add a link to your project.
- All done!


